C. cyaneopubescens display tank ideas

C_Strike

Arachnobaron
Old Timer
Joined
Jun 8, 2005
Messages
444
The pc doesnt give too much away on the basic structure design.. This weas 6months or so ago..2weeeks after puttin the gbb in


Heres the tank now


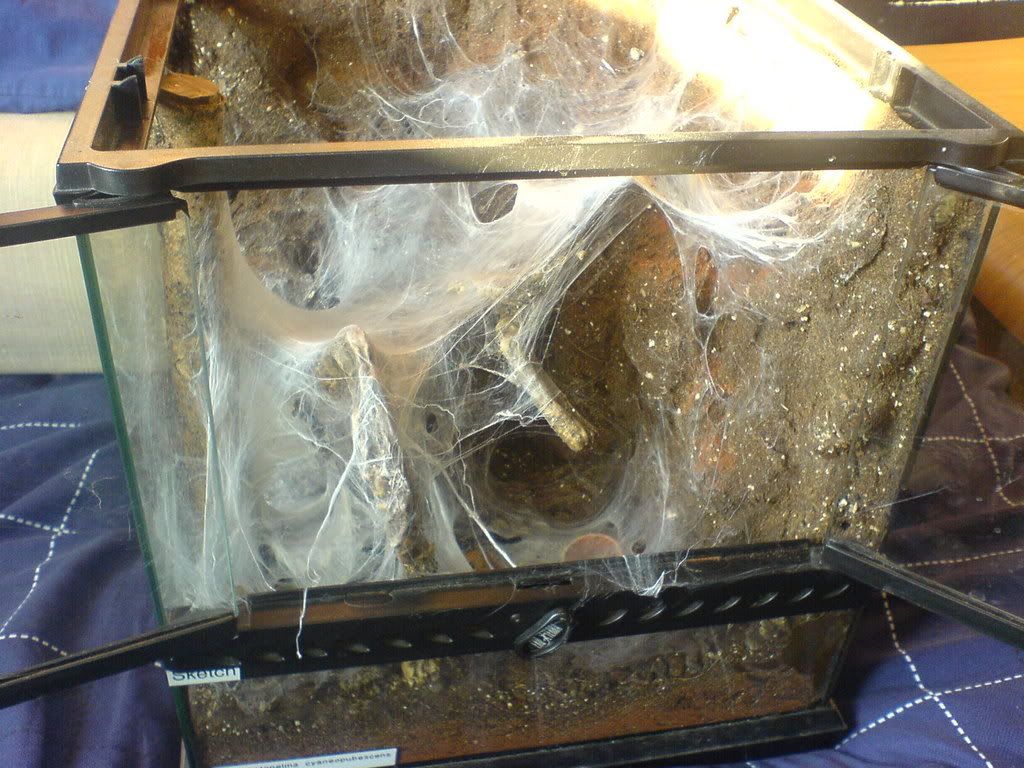
I chose thin structures for it to web around..Its very intricate web design..
She can access everywhere.
I had designed the tank to hold a scolopendra pede, but with the fake mini-tree in there it looks good
 

zimbu

Arachnosquire
Old Timer
Joined
Nov 26, 2006
Messages
141
Oh my... That tank looks amazing!!

That's the 12x12x12 right? I'm soooo getting that for her and making sure she can access everything to build webs like that, that's so cool.
 

TalonAWD

Arachnoprince
Old Timer
Joined
Jul 28, 2007
Messages
1,139
I'm considering the 12 x 12 x 12 Exoterra tank as well. That seems more appropiate.
 

zimbu

Arachnosquire
Old Timer
Joined
Nov 26, 2006
Messages
141
Is there anything that can be done to minimize the risk of a T getting it's claws caught in the screen? I'm worried about that and I've never seen a non custom built tank that doesn't ahve a screen lid.
 

TalonAWD

Arachnoprince
Old Timer
Joined
Jul 28, 2007
Messages
1,139
Is there anything that can be done to minimize the risk of a T getting it's claws caught in the screen? I'm worried about that and I've never seen a non custom built tank that doesn't ahve a screen lid.
Remake the top in 1/8" Lexan (Acrylic sheet) and make a lot of small holes. Thats What I do. I even do this for my KK. I plan to do this when I get the Exoterra.
 

zimbu

Arachnosquire
Old Timer
Joined
Nov 26, 2006
Messages
141
Remake the top in 1/8" Lexan (Acrylic sheet) and make a lot of small holes. Thats What I do. I even do this for my KK. I plan to do this when I get the Exoterra.
Do you use the existing frame that the screen is attached to or do you just cut a peice of acrylic to the same size as the entire top?
 

Drachenjager

Arachnoemperor
Old Timer
Joined
Jan 23, 2006
Messages
3,509
The only time I'd wouldn't recomend a GBB is if somone is looking for a hand pet. They can be skittish and kickers, though mine isn't at all. The GBB is stunning, VERY hardy, good eater, fair size. What more could anyone want in a T ?

I'm surprised I only have one of these beauties !
you mean like this?


TalonAWD

Arachnoprince
Old Timer
Joined
Jul 28, 2007
Messages
1,139
Really cute!! How old is she and is she your daughter.
I have two daughters and the oldest (2 yrs old) always want to see my beauties.... she says they are ugly:p but yet she always want to see them!!!{D
 

Drachenjager

Arachnoemperor
Old Timer
Joined
Jan 23, 2006
Messages
3,509
Really cute!! How old is she and is she your daughter.
I have two daughters and the oldest (2 yrs old) always want to see my beauties.... she says they are ugly:p but yet she always want to see them!!!{D
shes 6 and my granddaughter. all my grandkids like them and always want to hold them lol my neice likes to see them but id i even act like i am gonna open a cage she runs lol
 

zimbu

Arachnosquire
Old Timer
Joined
Nov 26, 2006
Messages
141
Aww, your granddaughter is a cutie, congrats!

...Nice spider too!
 

TalonAWD

Arachnoprince
Old Timer
Joined
Jul 28, 2007
Messages
1,139
Excellent Tank.

Well I got the Exo Terra Small (12x12x12) tank (Ebay) and I can see this would do just fine. With the top I'm going to cut a 1/8" sheet of acrylic to conform to where the screen top goes. I'm going to modify the sheet so that I can save the original screen top for future use so that I don't mess with the original top design. (Since it locks in place) Pretty easy. The size is larger than my original enclosure idea so I can put even more thought into the interior design.:clap:
 

Nitibus

Arachnodemon
Old Timer
Joined
Feb 7, 2007
Messages
728
Well I got the Exo Terra Small (12x12x12) tank (Ebay) and I can see this would do just fine. With the top I'm going to cut a 1/8" sheet of acrylic to conform to where the screen top goes. I'm going to modify the sheet so that I can save the original screen top for future use so that I don't mess with the original top design. (Since it locks in place) Pretty easy. The size is larger than my original enclosure idea so I can put even more thought into the interior design.:clap:

Drill LOTS of holes in the acrylic lid. Don't forget GBB's like it bone dry. The better the ventilation, the better it is for the GBB.
 

TalonAWD

Arachnoprince
Old Timer
Joined
Jul 28, 2007
Messages
1,139
Drill LOTS of holes in the acrylic lid. Don't forget GBB's like it bone dry. The better the ventilation, the better it is for the GBB.
Yeah so I have read, I don't even have to worry about humidity and thats great. Thanks for the tip.
 

Drachenjager

Arachnoemperor
Old Timer
Joined
Jan 23, 2006
Messages
3,509
mine is in a 12X12X12" exoterra wiht jsut the background and a clay pot right now . she has been webbing it up a bit . took this pic today after she dove off the pot for a cricket lol
 

TalonAWD

Arachnoprince
Old Timer
Joined
Jul 28, 2007
Messages
1,139
Ok well I have been working on the setup and wanted to share since thats what this thread is about.
Description: Basically it is said that the GBB is a mixed land/air type of tarrantula. So I made the setup to have branches for its webs and for its land I have a cave and a small bridge midway above cave so up in the air there is land as well. The walkway goes behind the "Y" branch so that area behind the "Y" can be like a retreat. The Left side branch has a retreat under it on the wall. The cave has a window for me to look through in case it decides to hide out there or molt. When I made everything, I made sure there were no small crevices for crickets to hide in. I left the rock background to give it a "Look" and to compliment my dirt walls. I still need to add Peat and maybe some decor. The large branch that runs in front of the cave is going to serve as a step up into cave. This branch will be partially covered with dirt to appear as a Root. The original dead tree was in the ground this way when I found it.
Setup view:


Left side retreat under branch on wall


Cave view under bridge towards the back


Outside view of cave...My window. You can also see the area behind the "Y" branch.
 

Nitibus

Arachnodemon
Old Timer
Joined
Feb 7, 2007
Messages
728
Talon

That tank looks great ! Good work

I'd only make 2 sugestions :

Put a liitle substrate on the floor of the hide you built. It will make it more likely your T will use it. Let it dig to the glass if it wants.

Add a water dish. My GBB uses her's after every moult, and probably at other times when I don't see her. Many will say they don't need water dish for GBBs, but I'd much rather it have water, than a dead T.
 

TalonAWD

Arachnoprince
Old Timer
Joined
Jul 28, 2007
Messages
1,139
Talon

That tank looks great ! Good work

I'd only make 2 sugestions :

Put a liitle substrate on the floor of the hide you built. It will make it more likely your T will use it. Let it dig to the glass if it wants.

Add a water dish. My GBB uses her's after every moult, and probably at other times when I don't see her. Many will say they don't need water dish for GBBs, but I'd much rather it have water, than a dead T.
Thanks!!! The pictures are of the portion of the setup that I created. I still have to add Peat. I do plan to add peat all over. Like I stated I want to make a step into the cave but will use peat (Spaghum peat moss)I did think it might dig so the lil window will help me know this. As for a water dish. I totally agree with you!! The plan for a water dish was in the design. My water dish will go in the front of the tank on the left side (under the retreat on the wall) This is so that I can change the water if needed without disturbing much of the future webbing. I'm thinking of getting Dry Moss (Maybe Spanish moss) to add details. I will take pics of the final finished product when its done. (I could not wait to show my progress {D ) I also have to create the Acrylic top.
I collected lots and lots of different tree branches and parts to create maybe 2 more tanks. I want to make Tropical one next. Its a lot of work but very entertaining. So far it took 4 days. About 5 hours each day. Most of the work was just sitting there thinking how to make it and what will the GBB and crickets do with the design. {D
 

zimbu

Arachnosquire
Old Timer
Joined
Nov 26, 2006
Messages
141
oh man, that looks bloody brilliant Talon! I'm actually working on mine as we speak (moss is in the oven) and I should be able to get pictures up on Monday when I'm back at home.

I took a totally different approach to mine and tried to get some fake plants that look like grasses and succulents that might grow in an arid region, I'm hoping she'll climb some of them and web fairly heavily. Also, The tank I got was a birthday present, so my grandparents got the 18 inch tall one by mistake, so I decided to take advantage of the extra height by mounding the substrate up quite a bit at the back to make it look like it's on a hillside.

You HAVE to post pictures of yours once it's all set up and you have the spider in it!!

Edit: are you using black styrofoam to make the solid walls/cave?
 

TalonAWD

Arachnoprince
Old Timer
Joined
Jul 28, 2007
Messages
1,139
oh man, that looks bloody brilliant Talon! I'm actually working on mine as we speak (moss is in the oven) and I should be able to get pictures up on Monday when I'm back at home.

I took a totally different approach to mine and tried to get some fake plants that look like grasses and succulents that might grow in an arid region, I'm hoping she'll climb some of them and web fairly heavily. Also, The tank I got was a birthday present, so my grandparents got the 18 inch tall one by mistake, so I decided to take advantage of the extra height by mounding the substrate up quite a bit at the back to make it look like it's on a hillside.

You HAVE to post pictures of yours once it's all set up and you have the spider in it!!

Edit: are you using black styrofoam to make the solid walls/cave?
Sounds awesome! I look foward to your pics! I'm going to see what fake plants to add. Maybe I'll head over to a crafts store and take a look at the plants, maybe the ol' lightbulb over my head will light up :D
The way I made the tank walls, bridge and cave..... Well I took the ideas from ---> http://www.blackjungle.com/gallery2/main.php?g2_itemId=2108

I used the black Silicone to coat the walls of the tank. I left the rock styrofoam background that came with the Exo Terra tank. The Black silicone I used was Black Silicone II (for windows and doors found at the hardware store)and with a plastic spatula spread it over the glass walls. Only had to worry about the left and right walls for my particular Idea since I left the background. You will have to wait for it to dry a bit than spread another coat of silicone over the first coat. (an hour) The silicone does not appear black enough with one coat and you will be able to see a bit through it. The second coat makes it darker. For walls and cave I used one can of Great stuff insulating foam sealant. Mock up the setup with props if you want the foam to hold them in place. This is the harder part. You have to have a good idea of how you want it to look. You spray the stuff in the ideas you have for your setup, and than it will expand. The thing that I learned is that even if you think you need more foam, you probably won't because this stuff keeps expanding for an hour!:eek: I just went crazy with the stuff thinking it was not enough and after 2 hours the tank was covered with foam! To speed up the curing process you can mist the foam with water. This actually speeds up the curing process for the outer portion but the inner portion will take time to cure. I started to use a blade at first but it was just too much foam so I just used my hands, ripping in small chunks for fine tuning and large chunks for heavy modification (cause it just keeps getting biggger!) Than after you have it the way you like it, just use Black silicone to coat the foam. Than chase the coating with Peat moss of coco fiber. I just used my fingers. Work in small sections so that the silicone does not skin over. I would say you have 10 minutes to coat the silicone with peat before it loses it "Stickyness". Than after coating the section, shake the tank (I shook it onto a glass table) than vacuum excess. Repeat for the next section until its all covered. The silicone can fill in holes and cracks so I just use more in those areas. (We don't want a cricket hiding out!)
Finally after its all dry (a day or 2) just remove the silicone that you did not cover with foam with a blade. I used 3 different style blades to get the desired effects (likes curves)
Use alot of light! It helped me for the detailing and covering the foam. I made sure every tiny bit of foam was covered.
Sorry for the long post!
 
Top